GitHubとの連携手段(OAuth Apps, GitHub Apps)を整理する
03/01 23:34 2021
01/03 14:22 2026
はじめに
GitHubは、GitHubと連携した独自のアプリケーションを作成する手段として、GitHub AppsとOAuth Appsを提供しています。 連携する際のシーケンスをよく忘れるので、整理のため記事にすることにしました。
GitHub AppsとOAuth Appsの違い
詳細は、GitHub公式 | differences-between-github-apps-and-oauth-appsを読むと良いと思います。
大きな違いになるのは、下記の点と考えます。
- OAuth Appsは、ユーザーのアクセス可能なリソースに対して権限委譲可能
- GitHub Appsは、ユーザーや組織(Organization)の指定したリポジトリに対して権限委譲可能
OAuth Appsは、GitHubユーザーアカウントの権限を委譲するため、GitHubでSSOする際に利用する例もあります。(後述)
一方で下記の点でGitHub Appsと比較し扱い辛い点があります。
- 単一リポジトリに対してOAuth Appsを適用する場合に、委譲してもらう権限が大きすぎる
- マイナーなOAuth Appsの場合、開発者を信用できないとインストールできない
- OAuth Appsを適用したユーザーが組織から抜けると、連携解除される(抜けたユーザーの権限で適用されるため)
GitHub Appsは、GitHubリポジトリに対した権限設定が可能。前述した問題点を解消しています。 以上より、OAuth AppsはGitHubのユーザーに対するサービスを提供する際に適している一方で、リポジトリに対する手段としては扱い辛い点があります。
OAuth Apps
フロー
フローは下記です。端折っている部分もあります。
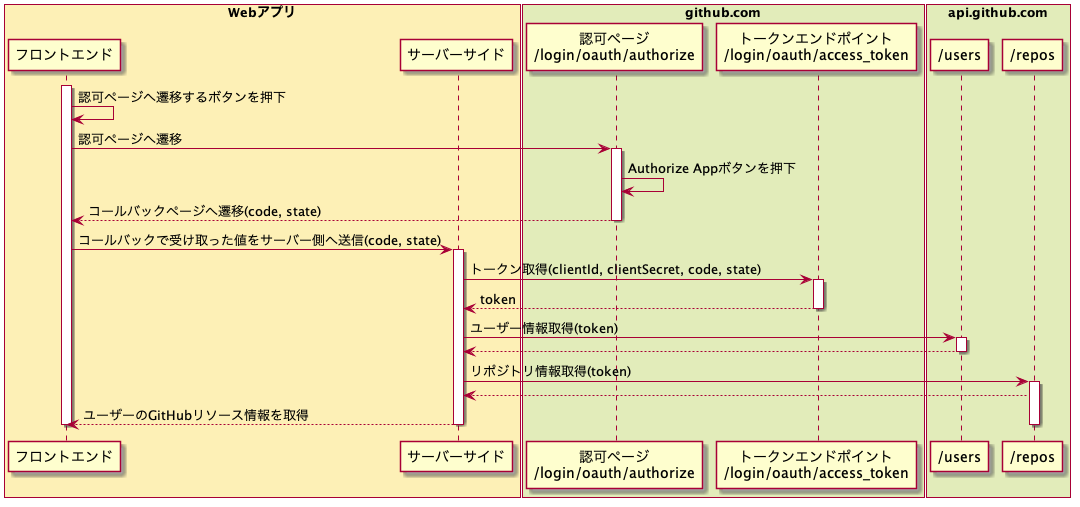
利用例
OAuth認証
OAuthは、プロフィールAPIと組み合わせることで認証することが可能です。OAuth認証と呼ばれていたりします。 OAuthは認可の仕組みですが、GitHubが不足している部分を拡張しているため認証に利用することが可能です。
注: ここからは推測を含みます。間違っていたらすいません。。
qiitaやdev.toといったサイトは、GitHubアカウントでログインすることが可能です。
これはGitHubのOAuth Appsを利用しOAuth認証を使うことで実現しています。
おおよそ、以下のような処理を実装していると推測します。
- サインアップ処理 1.1. (Webアプリフロント) GitHubで登録ボタンを押下 1.2. (GitHubフロント) GitHubの認可画面で認可ボタンを押下 1.3. (Webアプリフロント) コールバックで返却された値をブラウザ側で保持 1.4. (Webアプリフロント) サービス内IDを入力させて、1.3.の情報とともにWebアプリサーバサイドへ送信 1.5. (Webアプリサーバー) 1.4.(clientId, clientSecret, state)を利用しトークンエンドポイントからトークンを取得 1.6. (Webアプリサーバー) 1.5.のトークンを利用し、GitHubのアカウントIDを取得 1.7. (Webアプリサーバー) GitHubのアカウントIDとサービス内IDの組み合わせをデータストアに登録
- ログイン処理 2.1. (Webアプリフロント) GitHubでログインボタンを押下 2.2. (GitHubフロント) GitHubの認可画面で認可ボタンを押下 2.3. (Webアプリフロント) コールバックで返却された値をサーバーサイドへ送信 2.4. (Webアプリサーバー) 2.3.を利用し、トークンエンドポイントからトークンを取得 2.5. (Webアプリサーバー) 2.4.のトークンを利用し、GitHubのアカウントIDを取得 2.6. (Webアプリサーバー) GitHubのアカウントIDから1.7.で登録されたサービス内IDを引く 2.7. (Webアプリサーバー) サービス内IDに紐づくリソースが取得可能なセッション、トークンを作成
GitHub Apps
次はGitHub Appsについてです
フロー
フローは下記です。端折っている部分もあります。

フローの解説
OAuth Appsと比較し、複雑です。上記の画像に振った番号の箇所について補足します。
登場する概念は下記の表の通りです。 例は空白は任意の文字列や数値で形式が決まっているものはイメージしやすいよう補足の意図で記載しています。
| 項 | 登場する概念 | 説明 | 例 |
|---|---|---|---|
| 1 | GitHub Apps ID | GitHub Appsに一意なID(開発者のコンソールではApp IDという表記です) | |
| 2 | GitHub Appsの秘密鍵 | GitHub Appsに登録した秘密鍵 | -----BEGIN RSA PRIVATE KEY-----...(省略) |
| 3 | installation_id | GitHub Appsをインストールした組織またはユーザーに割り当てられるID ※1 | |
| 4 | JWTトークン | GitHub Apspの情報を取得ためのトークン 1,2,3を利用して作成されたトークン |
eyJ..(省略) |
| 5 | アクセストークン | GitHub Appsをインストールしたユーザーリソースにアクセスするためのトークン 4と/app/installtions/${installtion_id}/access_tokenエンドポイントを用いて作成されたトークン |
① JWTトークンの作成
JWTトークンは、下記の方法で生成します
const cert = config.privateKey; // 表の項2
const payload = {
  exp: Math.floor(Date.now() / 1000) + 60,
  iat: Math.floor(Date.now() / 1000) - 10,
  iss: config.appId, // 表の項1
};

const jwtToken = jwt.sign(payload, cert, { algorithm: 'RS256' });
※1 GET /app/installations/{installation_id}を利用すれば、intalltion_idがユーザーに属するか組織に属するか確認することができます
② アクセストークンの作成
①で作ったJWTトークンを利用してアクセストークンを作成します
const response = await Axios.request({
  method: 'POST',
  url: `https://api.github.com/app/installations/${config.installationId}/access_tokens`,
  headers: {
    Authorization: `Bearer ${jwtToken}`, // 表の項4
    Accept: 'application/vnd.github.v3+json',
  },
});

const accessToken = response.data.token
③ 認可されたリポジトリ情報の取得
octokitを利用すると下記のようになります。(※1)
import { Octokit } from '@octokit/rest';

const octokit = new Octokit();

const response = await octokit.request(
  'GET /repos/{owner}/{repo}/contents/{path}',
  {
    owner: params.owner,
    repo: params.repo,
    path: params.path,
    headers: {
      Authorization: `token ${accessToken}`, // 表の項5
      Accept: 'application/vnd.github.v3+json',
    },
  },
);
※1 @octokit/auth-appを利用すれば、JWTの作成やアクセストークン作成の処理を隠蔽してくれます ただwebpackとの相性の問題があり、前述した形でリクエストしています。issue。
Tips: Octokitをラップする
最終的にこんな形でクラスを書いてあげると、便利だと思います。
/* eslint-disable @typescript-eslint/explicit-module-boundary-types */
import { Octokit } from '@octokit/rest';
import Axios from 'axios';
import * as jwt from 'jsonwebtoken';

type GitHubAuthAppConfig = {
  appId: number;
  privateKey: string;
  installationId: number;
  jwt: string;
  accessToken: string;
};

export class GitHubAuthApp {
  private config: GitHubAuthAppConfig;
  private octokit: Octokit;

  constructor(config: GitHubAuthAppConfig) {
    this.config = config;
    this.octokit = new Octokit();
  }

  static init = async (config: {
    appId: number;
    privateKey: string;
    installationId: number;
  }) => {
    const cert = config.privateKey;
    const payload = {
      exp: Math.floor(Date.now() / 1000) + 60,
      iat: Math.floor(Date.now() / 1000) - 10,
      iss: config.appId,
    };

    const jwtToken = jwt.sign(payload, cert, { algorithm: 'RS256' });

    const response = await Axios.request({
      method: 'POST',
      url: `https://api.github.com/app/installations/${config.installationId}/access_tokens`,
      headers: {
        Authorization: `Bearer ${jwtToken}`,
        Accept: 'application/vnd.github.v3+json',
      },
    });

    return new GitHubAuthApp({
      appId: config.appId,
      privateKey: config.privateKey,
      installationId: config.installationId,
      jwt: jwtToken,
      accessToken: response.data.token,
    });
  };

  getInstallId = async () => {
    const response = await this.octokit.request(
      'GET /app/installations/{installation_id}',
      {
        installation_id: this.config.installationId,
        headers: {
          Authorization: `Bearer ${this.config.jwt}`,
          Accept: 'application/vnd.github.v3+json',
        },
      },
    );

    return response.data;
  };

  uninstallId = async () => {
    const response = await this.octokit.request(
      'DELETE /app/installations/{installation_id}',
      {
        installation_id: this.config.installationId,
        headers: {
          Authorization: `Bearer ${this.config.jwt}`,
          Accept: 'application/vnd.github.v3+json',
        },
      },
    );

    return response;
  };

  // see https://docs.github.com/en/rest/reference/repos#contents
  getReposOwnerContentsPath = async (params: {
    owner: string;
    repo: string;
    path: string;
  }) => {
    const response = await this.octokit.request(
      'GET /repos/{owner}/{repo}/contents/{path}',
      {
        owner: params.owner,
        repo: params.repo,
        path: params.path,
        headers: {
          Authorization: `token ${this.config.accessToken}`,
          Accept: 'application/vnd.github.v3+json',
        },
      },
    );

    return response.data;
  };
}
利用例
おそらくCIサービスやBotサービスで使われることが多いと思います。 最近だとZennのリポジトリ連携でも利用されています。 恐らく、下記のような仕組みになっている考えられます。
注: ここからは推測を大いに含みます。間違っていたらすいません。。
-
サービス側のエンドユーザーのuserIdとinstallation_idを紐づける 1.1. GitHub Appsインストール後のコールバックで、サービス側のuserIdとinstallation_idをデータストアに保存 (ここで処理中になんからの例外が起きた場合、アプリのアンインストールエンドポイントを叩く DELETE /app/installations/{installation_id})
-
エンドユーザーがリポジトリにpush、pushイベント発火 2.1. GitHub AppsがGitHub Apps開発者が指定したエンドポイントにwebhookを送信 2.2. webhook内部のinstallation_idからJWT->アクセストークンを作成し、エンドユーザーの認可したリポジトリのコンテンツにアクセス 2.3. 1.で紐付けたuserIdをinstallation_idで引く 2.4. userIdに紐づいたサービス側のデータをリポジトリの内容で更新する
さいごに
OAuth AppsやGitHub Appsのシーケンスを整理すると、OAuthの仕組みやJWTについて理解を深めることができます。 また「なぜGitHubがこのようなシーケンスをしているか?」について考えてみると自分が似たようなシステムを設計するヒントになり良いなと感じました!
このような連携手段を無料で提供しているGitHubは偉大ですね...
参考
GitHub公式 | about-apps GitHub公式 | differences-between-github-apps-and-oauth-apps
shuntaka.dev
This site uses Google Analytics.